Features
Evaluating rescue tools
Not all scrap cars are created equal
February 22, 2021
By Chris Kerr
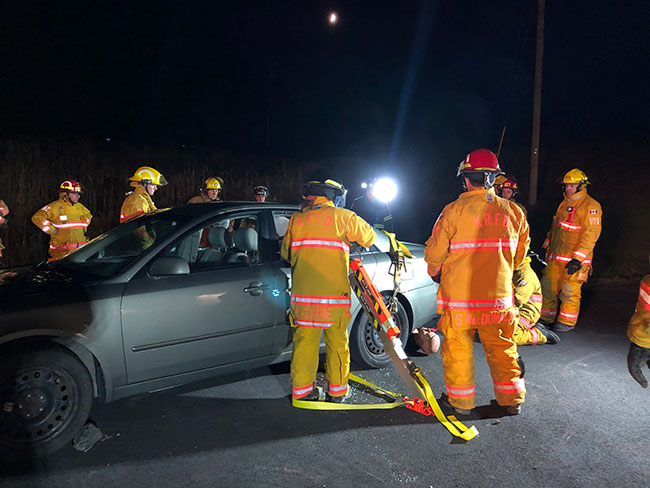
 Five door vehicles are becoming more common and can present different challenges.
ALL PHOTOS: Chris Kerr
Five door vehicles are becoming more common and can present different challenges.
ALL PHOTOS: Chris Kerr The purchase of new rescue tools represents a significant investment by any fire department and with the extended lifespan of these tools, utmost care should be taken that your trials and evaluations present the best opportunity for your selection committee to evaluate the tools in real-world scenarios. Far too often, I have seen departments evaluate tools by heading over to a local scrap or tow yard and trying them out on the first vehicle that they come across without any thought as to whether or not that vehicle presents a real or valid test of the tool. Additionally, when evaluating multiple brands or manufacturers’ tools, variations in the type of condition of the vehicles used can create distorted impressions of the performance of the tool.
As a firefighter, instructor and sales/training representative for a number of rescue product manufacturers, I have seen first-hand the difference that some preparation and forethought can make in ensuring that your evaluation presents the best possible evaluation of tools to suit your department’s needs and budget. In particular, take the time to evaluate the vehicles and location chosen for your evaluation carefully. Most scrapyards and vehicle recycling facilities will have a range of vehicles available and it would be worth “shopping” them to find vehicles in a condition that will best suit your requirement.
Modern day vehicles, modern day challenges
Modern vehicles provide many challenges to rescuers. If some care is taken in the selection of the vehicles for your demonstration, it will provide the best opportunity to see what different manufacturers can offer your department in rescue product solutions.
Ideally the types of vehicles selected for your demonstration or training would meet the following criteria.
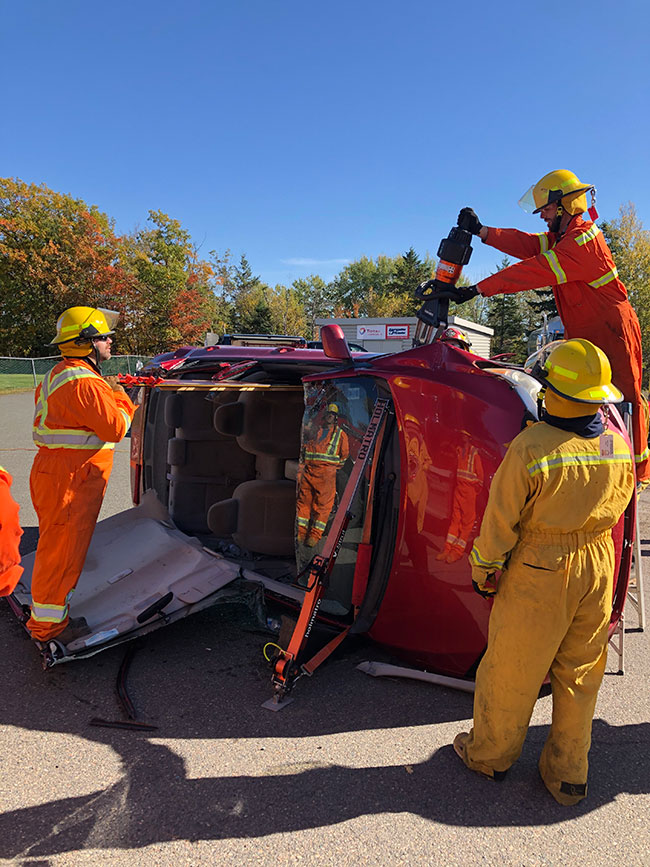
Late model sedans (4-door) are preferred. These represent a large proportion of roadway incidents and allow for demonstration of many different techniques and applications. I personally prefer sedans, as having rear doors allows more tasks to be completed. Things such as sidewall removal and some cross-ramming techniques are best shown on 4-door vehicles. Coupes (2-door) are acceptable but since they have less components they require less work and may not be ideal for larger groups to work on. You simply run out of car before everyone has a chance to get hands on. Both types of passenger car classes of vehicles are also excellent candidates for stabilization and lifting demonstrations when placed on their sides or roofs.
Five door vehicles (station wagons, crossovers, SUVs) are also a good choice as their larger size and often heavier construction present unique challenges. It is also worth noting is that this class of vehicles is rapidly becoming the most common found on the road and can make excellent demonstrators.
Pick-up trucks, minivans and commercial vehicles are not ideal. Again, these vehicles typically have less doors, making them less than ideal as demonstrators. They can, however, be very useful as second or third vehicles in a hydraulic rescue tool demonstration. They can provide different and unique challenges for rescuers and would be good selections for stabilization product demonstrations but would not be my first choice for a primary or sole vehicle in an evaluation.
No matter what type of vehicle you choose or are able to obtain for your evaluation, ideally any vehicle used would be complete. For example, all four wheels and tires are in place, the windscreen in still there (broken is fine), all body panels, doors and hood/trunk are in place and at least somewhat functioning. Missing engines or transmissions are acceptable but not preferred. Missing side/rear window glass is generally not a concern as it will need to be removed regardless.
Here are some other general considerations for selection of vehicles, regardless of type.
Age of the vehicle: While most of the vehicles commonly available for demonstration are not current production types, care should be taken to avoid extremely old vehicles. Modern rescue tools will certainly be able to handle these with ease, however the real challenges of modern vehicle rescue come from materials and construction techniques that are found in later model year products. Car from the mid 1980s will not have high strength steel, cast aluminum components, airbags, gas cylinders etc., to contend with. It is precisely these materials and construction methods that have driven innovation in rescue tools. In order to properly evaluate new tools, you are best served by putting them up against vehicles that you would commonly find on the road today.
Condition of the vehicle: Vehicles that are extremely rusted out, partially disassembled or have been exposed to fire should be avoided whenever possible. Some rust or bodywork is fine, but a car that has large sections of rust perforation (particularly in the rocker panels) will prevent demonstration of standard techniques. Significant fire damage weakens metal and causes the vehicle to come apart much differently than one without.
Vehicles involved in collisions: Insurance write-offs resulting from significant collisions can actually be an ideal choice. These present opportunities to demonstrate real-world application of tools and techniques. If accident damaged vehicles are not available, access to a backhoe or excavator to create realistic damage is a great resource.
Preparation: It is advisable, whenever possible, to use vehicles that have been drained of fuel and fluids and have had their batteries removed both for safety and to minimize any environmental concerns, particularly if vehicles will be on their sides/roof.
When selecting a location for evaluations or training, take weather, lighting and other hazards into consideration.

Presenting real-world scenarios can highlight strengths and weaknesses.
Choosing a location
Selection of a location for your demonstration or training is crucial to getting the most out of your time. Some departments have access to training grounds or local fire academies for this purpose, but many do not. Often departments have outstanding relationships with local tow companies who can bring vehicles to them for little or no cost, but in some cases, departments might have to purchase vehicles and/or pay for towing to have them brought out. It is also very common to conduct evaluations or training onsite at a local wrecker’s facility. Whichever way you end up getting your hands on the vehicles, some consideration to the location of your evaluation is helpful.
Fire Station – Outdoors: Training at your station or training facility is a great option. It keeps tools and equipment close at hand and you can often even remain in-service during your demonstration. If you have the ability to have cars brought to your station, it will also provide the ability to conduct some or all of the demonstrations and evaluation on-site.
Fire Station – Indoors: Depending on your station layout and local policies, it may even be possible to conduct rescue training and demonstrations indoors on the apparatus bay floor or in a garage or workshop space. If this is possible, I highly recommend ensuring that all fluids are removed from the vehicle and any needed glass is removed before bringing the units inside to reduce clean-up requirements. Laying out tarps or salvage covers can also minimize the amount of cleaning needed. Be cautious doing this. I have seen cribbing and stabilization struts slip on polished concrete flooring.
Scrapyard: The most common location for demonstrations are at a scrapyard or towing company yard. This is normally the most cost-effective option, provides a greater selection of vehicles and minimizes the required clean-up. The challenge often faced is that most scrapyard facilities are not set up with firefighter training in mind. There are often hazards involved with the use of a scrapyard that would not be faced on a typical training ground.
Regardless of where you choose to hold your demonstration, a few common issues need to be addressed, both in the interest of safety and in order to provide the best learning opportunity.
Any location should ideally be on flat, solid and clear ground. Sloped ground, deep mud and tall grass are not only unpleasant to work in but present safety concerns relating to slips and falls, risk lost or misplaced items and cause undue wear and tear on tools and equipment. When working at a scrapyard, the area around the vehicle(s) being used should be cleared of debris and other hazards as much as possible.
Any location will require adequate lighting. Apparatus scene lighting can be used, but battery powered lighting is preferred for reduced noise. Particularly when using equipment that you are not familiar with, the ability for the trainer or demonstrator to communicate is critical.
Some consideration should be made for weather. Bearing in mind that rescue tool demonstrations typically take a minimum of two and a half hours, care should be taken to ensure that your members have some relief from extremes of hot/cold/wet weather.
This is far from a comprehensive list of considerations; the above suggestions are meant to help you ensure an accurate, informative and educational demonstration that properly aids you in making the right choice of equipment for your department.
Chris Kerr is a firefighter in Salisbury New Brunswick and the rescue product specialist for Micmac Fire & Safety Source Ltd. serving all of Atlantic Canada. He can be reached at c.kerr@mmfss.ca.
Print this page
Advertisement
- NFPA Impact: Accessing resources for sprinkler education
- First responders in Sudbury may soon get a therapy dog to help them cope with stress